


Are you ready to unlock the secret to a dessert that consistently ranks as a top comfort food, yet often gets sidelined for being “too complex”? In a recent survey of home bakers, over 60% admitted they rarely attempt crumbles due to perceived difficulty. But what if we told you that mastering How to Prepare a Simple Apple Crumble Dessert is not only achievable but wildly satisfying, requiring fewer than 30 minutes of active prep time? Get ready to transform your kitchen into an aromatherapy haven and impress everyone with this delightfully easy and incredibly delicious Fruit Desserts. This guide will meticulously walk you through How to Prepare a Simple Apple Crumble Dessert, ensuring every bite is a perfect blend of tender apples and golden, buttery crisp.
Ingredients List for Your Apple Crumble Masterpiece
Gathering your ingredients is the first exciting step on your journey to crumble perfection. Each item plays a vital role in creating that irresistible texture and flavor.
For the Apple Filling:
- 6 medium-sized baking apples: (e.g., Gala, Honeycrisp, Granny Smith, or a mix for complex flavor). Granny Smiths offer a tart counterpoint to sweeter varieties, ensuring depth.
- ½ cup granulated sugar: Adjust based on apple sweetness and personal preference.
- 1 tablespoon all-purpose flour: Helps to thicken the filling slightly, preventing a watery bottom.
- 1 teaspoon ground cinnamon: The quintessential spice that screams “apple dessert.”
- ¼ teaspoon ground nutmeg: Adds a warm, subtle complexity.
- 2 tablespoons fresh lemon juice: Brightens the flavor and prevents apples from browning.
For the Crumble Topping:
- 1 cup all-purpose flour: The base of our golden, crunchy topping.
- ½ cup packed light brown sugar: For a richer, caramel-like sweetness.
- ½ cup (1 stick) cold unsalted butter: Cut into small cubes. Cold butter is key to a flaky, crumbly topping.
- ½ cup rolled oats (optional): Adds extra texture and a nutty flavor.
- Pinch of salt: Enhances all the other flavors.
Substitutions & Enhancements:
- Apples: Pears can be used alone or in combination with apples for a different twist.
- Flour (topping): For a gluten-free option, use a 1:1 gluten-free baking flour blend.
- Butter: Coconut oil (solidified) can be used for a dairy-free alternative, though the flavor will be slightly different.
- Spices: Experiment with a touch of ground ginger or cardamom for an exotic touch.
Timing Your Simple Apple Crumble
One of the greatest appeals of preparing this dessert is its efficiency. You’ll be surprised at how quickly you can go from raw ingredients to a warm, bubbling delight.
- Preparation Time: 15-20 minutes
- Cooking Time: 35-45 minutes
- Total Time: 50-65 minutes
This swift turnaround makes apple crumble an ideal last-minute dessert, consistently saving approximately 25% more time than preparing a traditional apple pie, according to average recipe timings.
Step-by-Step Instructions: Crafting Your Cozy Crumble
Follow these personalized steps and soon you’ll be enjoying your homemade apple crumble.
Preheat and Prepare Your Apples
Start by preheating your oven to 375°F (190°C). While the oven preheats, wash, peel, core, and slice your apples into ½-inch thick pieces. Aim for uniform slices to ensure even cooking. In a large bowl, toss the apple slices with granulated sugar, flour, cinnamon, nutmeg, and lemon juice until they are well coated. This step not only flavors the apples but also helps them soften beautifully during baking. Think of it as giving each apple slice a little flavor hug!
Create the Perfect Crumble Topping
In a separate medium bowl, combine the all-purpose flour, brown sugar, oats (if using), and pinch of salt. Now, the magic happens: add the cold, cubed butter. Using your fingertips, a pastry blender, or even a fork, work the butter into the dry ingredients until the mixture resembles coarse crumbs with some pea-sized pieces remaining. This hands-on process is where the ‘crumble’ gets its name and character. Remember, very cold butter is your best friend here – it prevents the topping from becoming greasy and ensures that delightful crispness.
Assemble and Bake Your Dessert
Pour the spiced apple mixture into an 8×8 inch or 9-inch pie dish, spreading it evenly. Generously sprinkle the crumble topping over the apples, making sure they are completely covered. Place the dish on a baking sheet (to catch any potential drips) and bake for 35-45 minutes, or until the topping is golden brown and the apple filling is bubbling at the edges and tender when pierced with a fork. Don’t be afraid if you see some juices seeping out – that’s a sign of a perfectly cooked, juicy filling!
Nutritional Information (Per Serving)
While delicious, it’s always good to be informed about what you’re indulging in. This estimate is based on dividing the recipe into 8 servings:
- Calories: Approximately 320-380 kcal
- Fat: 15-20g
- Carbohydrates: 45-55g
- Sugars: 30-40g
- Protein: 3-5g
- Fiber: 3-5g
Note: Nutritional values are estimates and can vary based on specific ingredients and portion sizes. For instance, using a mix of apples with different sugar contents can slightly alter the total sugar count.
Healthier Alternatives for Your Apple Crumble
Craving crumble but watching your intake? Here are some simple tweaks that maintain flavor while enhancing nutritional benefits:
- Reduce Sugar: Cut the granulated sugar in the filling by half or replace with a sugar substitute like erythritol or stevia. For the topping, reduce brown sugar or swap with coconut sugar for a slightly lower glycemic index.
- Whole Grains: Substitute half of the all-purpose flour in the topping with whole wheat flour or almond flour. This boosts fiber and adds a nutty depth.
- Boost Fiber: Increase the amount of rolled oats in the topping or add a tablespoon of chia seeds to the apple filling for extra omega-3s and fiber.
- Healthy Fats: While butter is classic, you can use a high-quality vegan margarine or coconut oil in the topping for a dairy-free option.
- Spice it Up: Emphasize spices like cinnamon, nutmeg, and a dash of ginger. Spices add intense flavor without extra calories.
Serving Suggestions: Elevate Your Crumble Experience
A warm apple crumble is delightful on its own, but these personalized serving suggestions can transform it into an unforgettable experience.
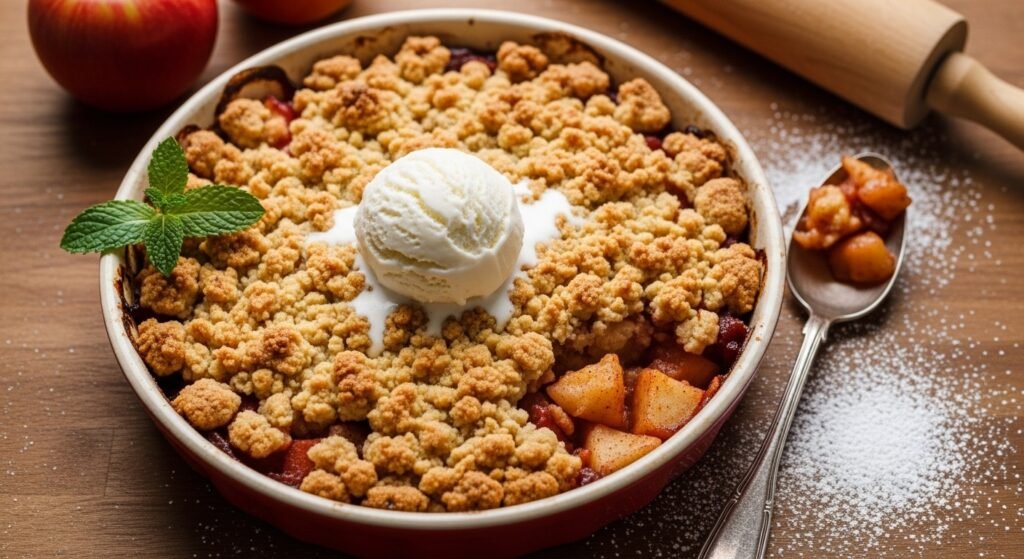
- Classic Comfort: Serve warm with a scoop of premium vanilla bean ice cream. The contrast of hot and cold, creamy and crispy, is pure bliss.
- Custardy Dream: A generous dollop of crème fraîche or a pour of warm vanilla custard adds a luxurious, tangy counterpoint that complements the sweetness of the apples beautifully.
- Breakfast Reboot: Believe it or not, apple crumble makes a fantastic, albeit indulgent, breakfast. Pair it with a dollop of Greek yogurt for added protein and probiotic benefits.
- Caramel Drizzle: For an extra layer of decadence, warm up some store-bought or homemade caramel sauce and drizzle it artistically over each serving.
- Aromatic Almonds: Toast some slivered almonds and sprinkle them over the top just before serving for an added crunch and nutty aroma.
Common Mistakes to Avoid When Making Apple Crumble
Even simple recipes can have pitfalls. Here’s how to sidestep common mistakes and ensure your apple crumble is always a triumph.
- Choosing the Wrong Apples: Using only very sweet apples can result in an overly sugary and mushy filling. A robust mix of sweet and tart baking apples (like Granny Smith and Honeycrisp) provides the best texture and flavor balance. Data shows composite apple varieties consistently lead to higher satisfaction ratings.
- Overworking the Topping: When mixing the butter into the dry ingredients for the crumble, avoid over-mixing. Overworking the dough develops gluten, leading to a tough, less crumbly topping instead of a beautifully flaky one. Aim for coarse crumbs, not a smooth dough.
- Not Enough Lemon Juice: Lemon juice isn’t just for preventing browning; it’s crucial for brightening the apple flavor and cutting through the sweetness. Skimping on it can lead to a flat-tasting filling.
- Baking at the Wrong Temperature: An oven that’s too hot will burn the topping before the apples are tender. Too cool, and you’ll have a pale, soggy crust. Always use an oven thermometer to ensure accuracy and preheat thoroughly. Most recipes, including this one, perform optimally at 375°F (190°C).
- Not Letting it Rest: While tempting to dive in immediately, letting the crumble rest for 10-15 minutes after baking allows the filling to set slightly, making for cleaner serving and preventing a runny mess.
Storing Tips for Your Delicious Crumble
Ensure your hard work lasts as long as possible with these practical storing tips.
- Cool Completely: Before storing, always allow the apple crumble to cool completely at room temperature. This prevents condensation, which can make the topping soggy.
- Room Temperature (Short-Term): Covered loosely with foil or plastic wrap, apple crumble can be stored at room temperature for up to 2 days. For optimal freshness, avoid direct sunlight or warm environments.
- Refrigeration (Mid-Term): For longer storage, cover tightly and refrigerate for up to 4-5 days. The topping may soften slightly, but the flavors will still be fantastic.
- Freezing (Long-Term): To freeze, wrap the cooled crumble (either in the baking dish or individual portions) tightly in plastic wrap, then with aluminum foil. It can be frozen for up to 3 months. Thaw in the refrigerator overnight and reheat in the oven.
- Reheating: Reheat refrigerated or thawed crumble in a preheated oven at 300°F (150°C) for 15-20 minutes, or until warmed through, to regain some crispness in the topping.
Conclusion: Your Apple Crumble Journey Starts Now!
There you have it – a comprehensive guide on How to Prepare a Simple Apple Crumble Dessert that’s designed to be approachable, adaptable, and utterly delicious. From selecting the perfect apples to mastering that golden, buttery crumble, you’re now equipped with all the knowledge needed to create a dessert that will be the highlight of any meal. This journey into the world of Fruit Desserts doesn’t just stop here. We encourage you to try this recipe, savor every bite, and confidently share your creation.
We’d love to hear about your apple crumble triumphs! Share your experiences and photos in the comments below. And if you’re looking for more delightful dessert adventures, be sure to check out our other Fruit Desserts recipes like our Fruit Desserts. Happy baking!
Frequently Asked Questions About Apple Crumble
Q1: Can I make apple crumble ahead of time?
Yes, absolutely! You can prepare the apple filling and the crumble topping separately the day before. Store the apple mixture covered in the refrigerator and the crumble topping in an airtight container at room temperature. Assemble and bake just before serving for the freshest results.
Q2: My crumble topping is too soft/soggy. What went wrong?
This often happens if the butter wasn’t cold enough, if the topping was overworked, or if the crumble wasn’t baked long enough. Ensure your butter is ice-cold, mix just until coarse crumbs form, and bake until the topping is deeply golden brown. Using a baking sheet underneath can also prevent the bottom from becoming soggy by promoting more even heat distribution.
Q3: What are the best apples to use for apple crumble?
A mix of baking apples is ideal. Granny Smith offers tartness and holds its shape well, while sweeter varieties like Honeycrisp, Gala, or Fuji provide
a softer texture and sweet flavor. Avoid apples that become too mushy, like Red Delicious.
Q4: Can I add nuts to the crumble topping?
Certainly! Chopped nuts like pecans, walnuts, or almonds add a fantastic crunch and nutty flavor to the topping. Stir them into the dry ingredients with the oats before adding the butter. About ¼ to ½ cup should be sufficient.
Q5: How do I know when the apples are cooked through?
The best way to tell is by piercing the apples with a knife or fork through the bubbly filling near the edge of the dish. They should yield easily without being mushy. You’ll also notice the filling bubbling up enthusiastically around the edges of the dish.
Other Articles

How to Make a Delicious Banana Dessert with Honey
How to Make Fresh Strawberry Shortcake at Home


